In this lesson
Apply heading styles, move a whole section and change all main headings by modifying one style.
Practice material
Compare the worked answer
Start with the practice file. Open the worked answer after trying the exercise. CSV and text briefs are also available. All resources and import notes →
Example
Q3 Office Move Plan — Operations memo
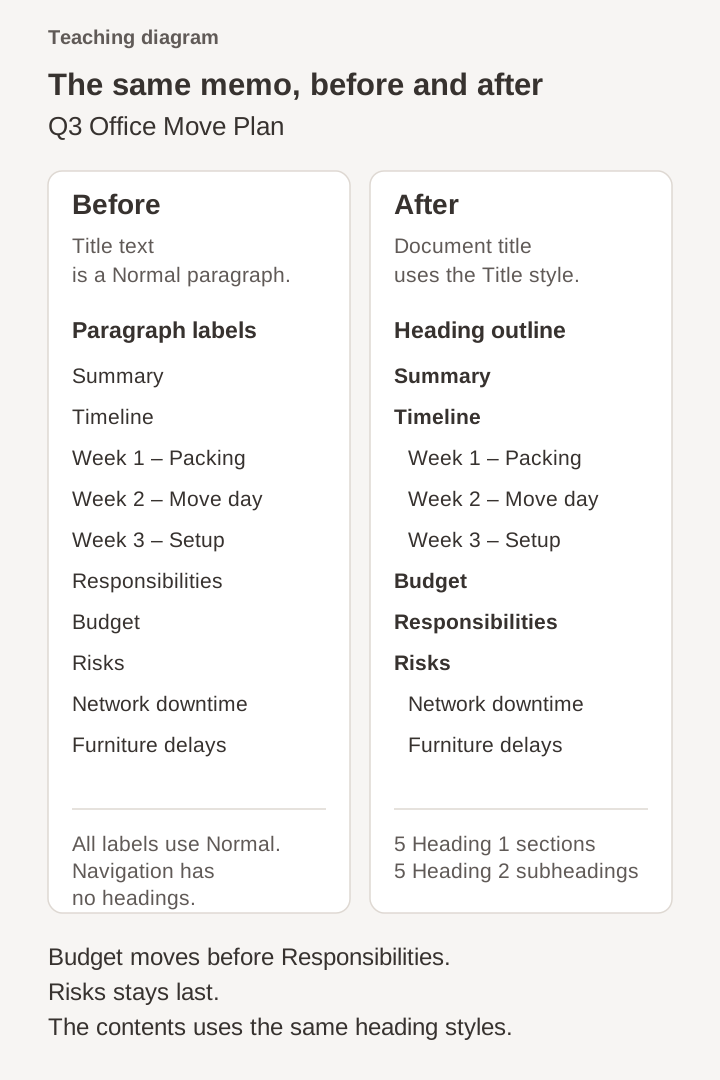
Dana from Operations wrote a two-page memo about moving the Seattle team to the 4th floor. Its headings are bold text, so the Navigation pane is empty. Readers have to scroll to find Budget.
How it works
A style is a named set of formatting settings. Heading 1 also tells Word that a paragraph is a main section, so it can appear in navigation and the contents. Making text bold alone does not provide that structure.
Heading 1 marks a main section; Heading 2 marks a subsection. Choose the level to match the content. If a heading looks too large, change its style rather than choosing a lower level just for its appearance.
Steps
Open word-memo-starter.docx for the editable memo, or copy the memo portion of word-brief.md into a DOCX: title, Summary, Timeline, Responsibilities, Budget and Risks. The starter’s bold labels are Normal paragraphs. If copying Markdown, remove markers such as # and leave out “Your deliverables”.
Turn on Home › Show/Hide ¶ (Ctrl+Shift+8). Delete extra blank paragraphs used for spacing.
Click in “Q3 Office Move Plan” and choose Title in Home › Styles.
Apply Heading 1 to Summary, Timeline, Responsibilities and Budget.
Under Timeline, apply Heading 2 to “Week 1 – Packing”, “Week 2 – Move day” and “Week 3 – Setup”.
Open View › Navigation Pane. Check the outline, then drag “Budget” above “Responsibilities”. The body text in that section should move with its heading.
Right-click Heading 1 in the Styles gallery and choose Modify. Change its size or color, then check that all main headings change.
Insert References › Table of Contents › Automatic Table 1 under the title. After changing headings, select Update Table › Update entire table.
Try it yourself
- Apply Heading 1 to Risks and place it last. If it is missing, add one “Risks” section; avoid creating a duplicate.
- Under Risks, apply Heading 2 to “Network downtime” and “Furniture delays” if those labels are already in your starter; otherwise add them. Keep one paragraph for each heading.
- Update the entire table of contents.
Show expected result
- The Navigation pane shows five Heading 1 sections in this order: Summary, Timeline, Budget, Responsibilities and Risks.
- The table of contents lists Risks and both sub-items with page numbers.
- Modifying Heading 1 changes every main section heading.
If something goes wrong
- The Navigation pane has no headings.
- Click a heading and check its style in Home. Apply Heading 1 or Heading 2; a large bold line may still be a Normal paragraph.
- One Heading 1 still looks different.
- Remove the extra formatting applied to that paragraph and reapply Heading 1. Use Modify on the style when the change should affect all main headings.
Quick check
Try these questions after the exercise. Check the result in your app before marking the lesson complete.
Choose an answer for all 3 questions to check your understanding.
Optional: try it with Copilot
If you have Copilot, try this after the exercise. Keep the original file and compare its suggestions with your own result.
Suggest a Heading 1 and Heading 2 outline for this memo using its existing content. Point out sections to split or merge, and leave the body text as written.
More from Microsoft
These Microsoft guides cover the tools used in this lesson.
Loading your progress…